Wrist Mechanics & Clubface Control
The Fundamentals promise a passive release—a face squared by the body, not saved by the hands. But "passive" is not the same as "random." The clubface only squares itself automatically when the wrists are set into the correct structure first. This page defines that structure.
Final Boss Golf treats the clubface as a direct output of the lead wrist. Get the wrist conditions right in the backswing and transition, and impact requires zero manipulation. Get them wrong, and every swing becomes a last-millisecond rescue.
Tactical entry for push slice / block right when path looks acceptable: Faults & Fixes symptom routing.
Trying to "square the face at impact" with the hands is a timing contest no human wins consistently. The clubface travels too fast through the strike to be steered. If the face is not already matched before delivery, the J-Curve cannot rescue it—you are gambling with a flip.
The Lead Wrist Controls the Face
There are two wrist motions that move the clubface, and one that stores power. Confusing them is why the range's "roll the forearms" advice produces a two-way miss.

Flexion & Extension (Face Angle)
This is the bow-versus-cup of the lead wrist, and it is the single biggest driver of face angle.
- Flexion (bowed): The back of the lead wrist bows toward the target. This squares-to-closes the face and removes loft.
- Extension (cupped): The lead wrist cups backward. This opens the face and adds loft.
The Hinge (Stored Power)
Radial hinge—the lever between the lead forearm and the shaft—stores the lag that fuels parametric acceleration. It loads the speed; it does not, on its own, aim the face.
Matching the Face to the Lead Wrist
In the Final Boss Method, a "square" clubface is defined by its relationship to the lead wrist and forearm, not by where it points at any single frame. When the clubface mirrors the angle of the lead wrist throughout the swing, it stays matched—and a matched face needs no manipulation to deliver square.
- At the top: A flat-to-slightly-flexed lead wrist keeps the face matched to the body's turn.
- In transition: Holding (or slightly adding) flexion as the arms drop into The Elbow Plane keeps the face from flipping open.
- Through impact: Body rotation and the J-Curve carry the matched face to square. The hands stay quiet.
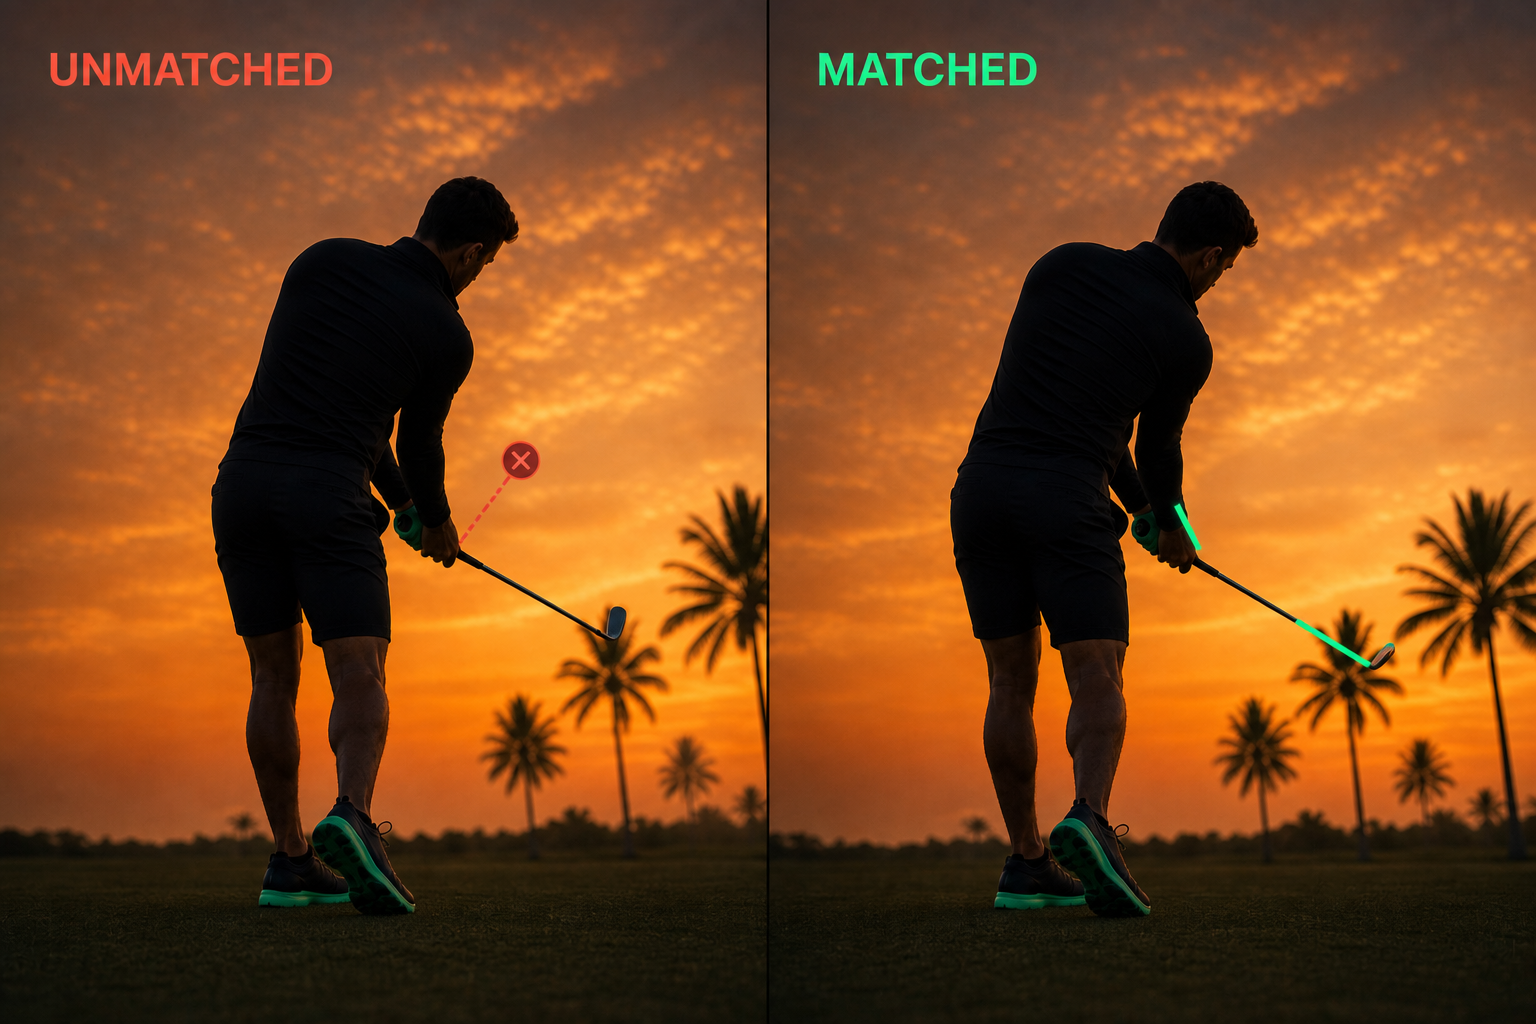
Face control is a setup-and-load problem, not an impact problem. Establish a flat-to-flexed lead wrist by the top and simply preserve it. The body squares a matched face for free—there is nothing left to time at the bottom.
Passive ≠ Limp
Passive face control does not mean soft, disconnected wrists. The wrists hold a structure under load—flexion maintained, hinge stored—while the larger muscles supply the motion. Power releases through that structure, not by actively unhinging or rolling it.
Consciously rolling the forearms to "close the face" turns the release into a timing window microseconds wide. Early roll = hook; late roll = slice. The same swing produces both misses on consecutive shots. Replace the roll with a held structure and let centrifugal force square the head.
How It Connects
| Mechanic | Relationship to the wrists |
|---|---|
| The Coil | The wrists set and hinge as the top loads—face matched before transition |
| The Elbow Plane | A slotted shaft lets the matched face stay matched into delivery |
| The J-Curve | The In-and-Up pull releases the stored hinge and squares the face passively |
| Impact & Compression | A flexed lead wrist delivers forward shaft lean and traps the ball |
Grooving This Pattern
Grooving this pattern
Wrist Mechanics & Clubface Control
Primary drill
Slow set-and-hold wrist rehearsals (no ball) — matched face at top and ; maps in Learn It **Do**
Delivery rule
set the wrist structure early, hold it, never roll.
Work through the three steps below in order—don't skip ahead.
If you get stuck
The Wrist Hinge Trainer and The Split-Grip Station (Prove It proof); The Exit Gate Station (handle won't track In and Up)
1. Learn It
~10% of your max · no ball
Slow rehearsals to the top and back—check a flat-to-flexed lead wrist and a matched face; pause at and confirm the face mirrors the lead forearm
set the wrist structure early, hold it, never roll. — map geometry at checkpoints; no rush. After each rep: Lead wrist is flat or slightly bowed, not cupped; hinge is loaded; no forearm roll
2. Prove It
~30–70% of your max · ball on
add a teed ball; The Wrist Hinge Trainer to feel the loaded structure; The Split-Grip Station to kill the flip and force a body-driven release. Ball flight does not matter.
Hold the structure through the strike—not ball-flight obsession (8 of 10 reps)
The Exit Gate Station so the handle tracks In and Up and the matched face stays matched
3. Play It
Up to 100% of your max · game speed
game speed, new target/club/lie (or distance and break on putting), and the full Pre-Shot Loop when ready.
a quiet, matched lead wrist—not a body-part checklist
After a two-way miss, reset with a slow set-and-hold rehearsal—rebuild the structure before the next ball
If you feel the urge to flip or roll at the bottom, your wrists were never set. Drop back to Learn It and establish a matched face at the top. A passive release only works when there is nothing left to fix.
The Cheatcode for your Game