The Coil: The Loaded Top
The driving range is obsessed with backswing positions—shaft parallel, lead arm straight, "get to the top." Final Boss Golf rejects the photo-op. The backswing has exactly one job: store the tension the downswing spends. The Coil is a spring under load, not a pose to hold.
That is why it is trained last. Once you know what the engine needs—an early re-center for Ground Reaction Forces and room to shallow into The Elbow Plane—you build the minimum effective coil that delivers it, and nothing extra.
Posing for a "perfect" top freezes the body. A coil is potential energy—stretch held under tension. Stop the motion to check a position and the spring goes slack, killing the kinematic sequence before transition even starts.
The Three Conditions of a Loaded Top
A coil that feeds the engine satisfies three geometric conditions—nothing about wrist angles or shaft pictures.

1. Separation (The Stretch)
Power is stored in the gap between the torso and the pelvis. The thorax rotates fully while the lower body resists, stretching the core like a wound spring.
- The Mechanic: Turn the chest behind the ball while the lead knee and pelvis hold back rotation.
- The Objective: Feel a stretch across the trail oblique and lat—that tension is the fuel the vertical thrust and J-Curve will release.
2. Width (The Radius)
The hands stay in front of the chest, preserving the swing radius that protects low-point control.
- The Mechanic: The lead arm structures the radius; the trail arm folds without collapsing the triangle inward.
- The Objective: Maximum width without lifting—a wide, loaded arc that gives the downswing room to shallow.
3. A Stable Axis (The Hub)
The entire coil happens around a fixed, inclined spine. The hub does not sway, lift, or dip.
- The Mechanic: Rotate around the sternum and head; pressure moves into the trail side without the center sliding off the ball.
- The Objective: A quiet hub so the early re-center can fire on time instead of rescuing a drifting body.
The Fake Turn vs. The Real Coil
Most amateurs look like they reach the top but never actually load. The arms lift and the hands travel, creating the illusion of depth while the chest barely rotates.
When the arms outrun the chest, the hands finish high and "stuck" behind the body with zero separation. There is no stored tension—only a lift. Transition then panics into an over-the-top steep delivery. Map real thoracic rotation with The Sternum Axis Tracker.
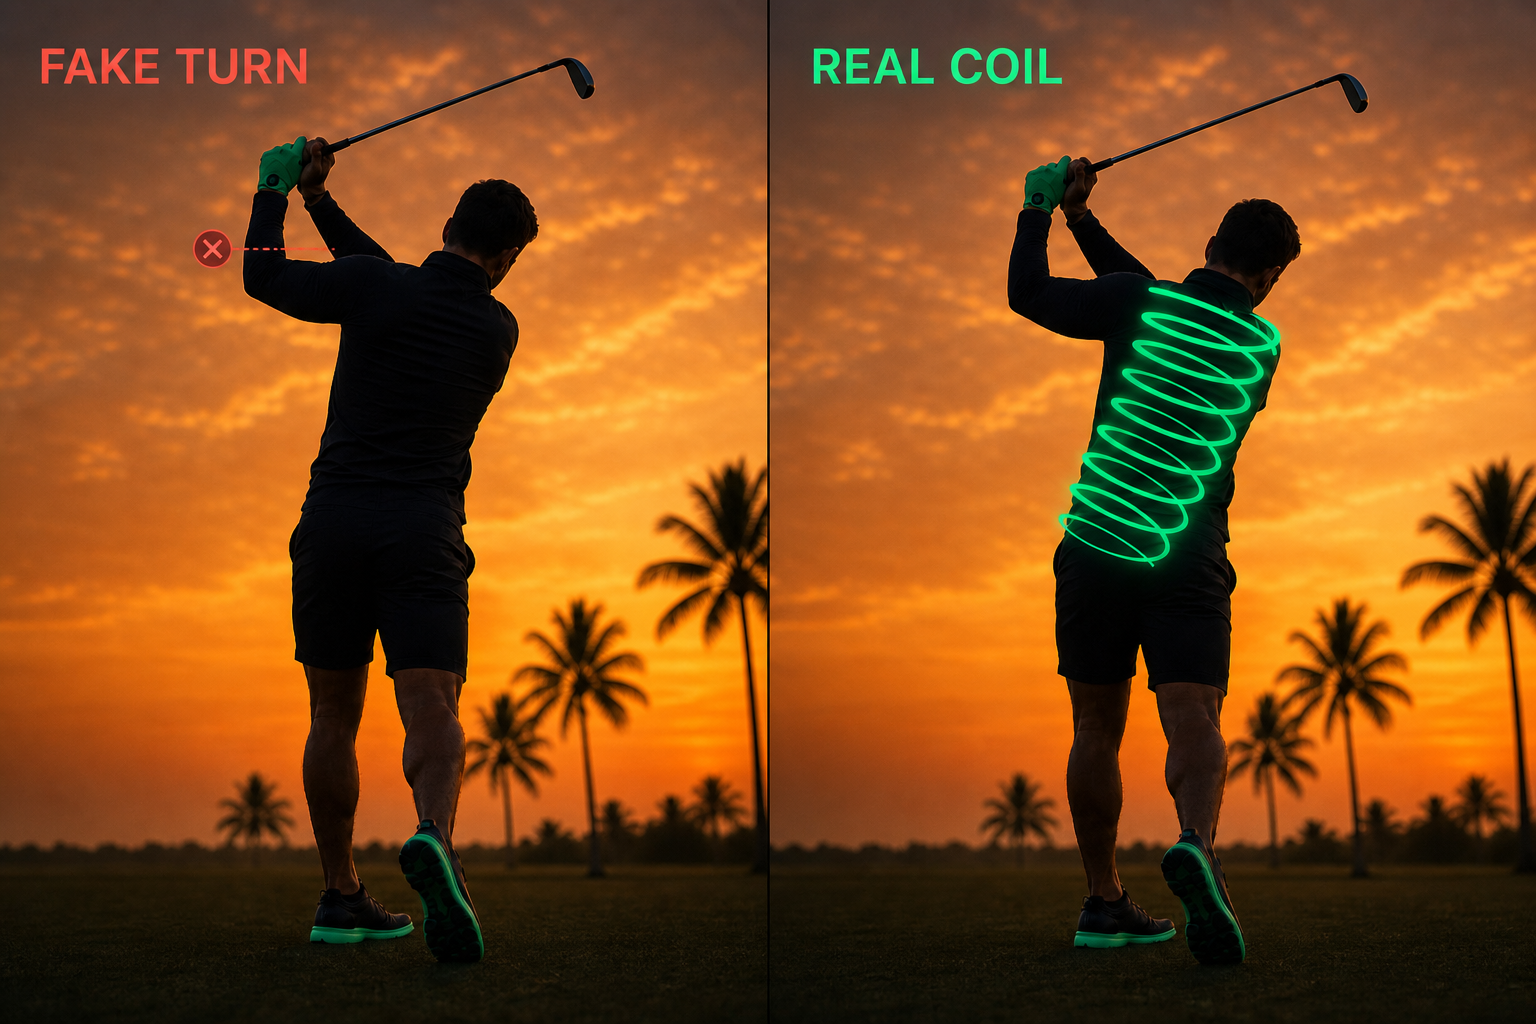
Stop measuring the backswing by how far the hands travel. Measure it by how much the chest turns against a quiet lower body. A shorter, fully-coiled top outperforms a long, slack overswing every time—it keeps the radius intact and the spring loaded.
The Top Is Not a Destination
In the Final Boss Method, the backswing and the transition overlap. The lower body begins its early re-center before the hands finish loading—the spring starts unwinding from the bottom while the top is still completing. There is no static pause to pose; there is a seamless change of direction off maximum stretch.
This is why a quiet, stable Coil matters: it is the only thing that lets the lower body fire early without the upper body collapsing or swaying.
Grooving This Pattern
Grooving this pattern
The Coil
Primary drill
Slow coil rehearsals (no ball) — chest turn against a quiet base; maps in Learn It **Do**
Delivery rule
rotate the chest against a quiet base, preserve width, never pose.
Work through the three steps below in order—don't skip ahead.
If you get stuck
The Sternum Axis Tracker (Prove It constraint); Forehead Post & Tailbone Glide (hub sway or dip); The Wall Walk (lower body won't resist the turn)
1. Learn It
~10% of your max · no ball
Slow coil rehearsals—turn the chest behind the ball, feel the trail-side stretch, hold width with the hands in front of the chest
rotate the chest against a quiet base, preserve width, never pose. — map geometry at checkpoints; no rush. After each rep: Separation is felt in the core, not the arms; the hub stays centered; no lift or sway
2. Prove It
~30–70% of your max · ball on
add a teed ball; The Sternum Axis Tracker exposes the fake turn—force real thoracic rotation instead of an arm lift. Ball flight does not matter.
Coil against the constraint—stretch, not reach (8 of 10 reps)
Forehead Post & Tailbone Glide if the hub sways or dips during the load; The Wall Walk if the lower body cannot resist the turn
3. Play It
Up to 100% of your max · game speed
game speed, new target/club/lie (or distance and break on putting), and the full Pre-Shot Loop when ready.
the chest-turn stretch—not a body-part checklist
After a mishit, let the lower body start the re-center off maximum stretch—never hunt for a static top
If the coil feels long but powerless, you are reaching, not stretching. Shorten the arm travel and deepen the chest rotation against a quiet base. The backswing is judged only by how cleanly it feeds Ground Reaction Forces—not by how it looks at the top.
The Cheatcode for your Game