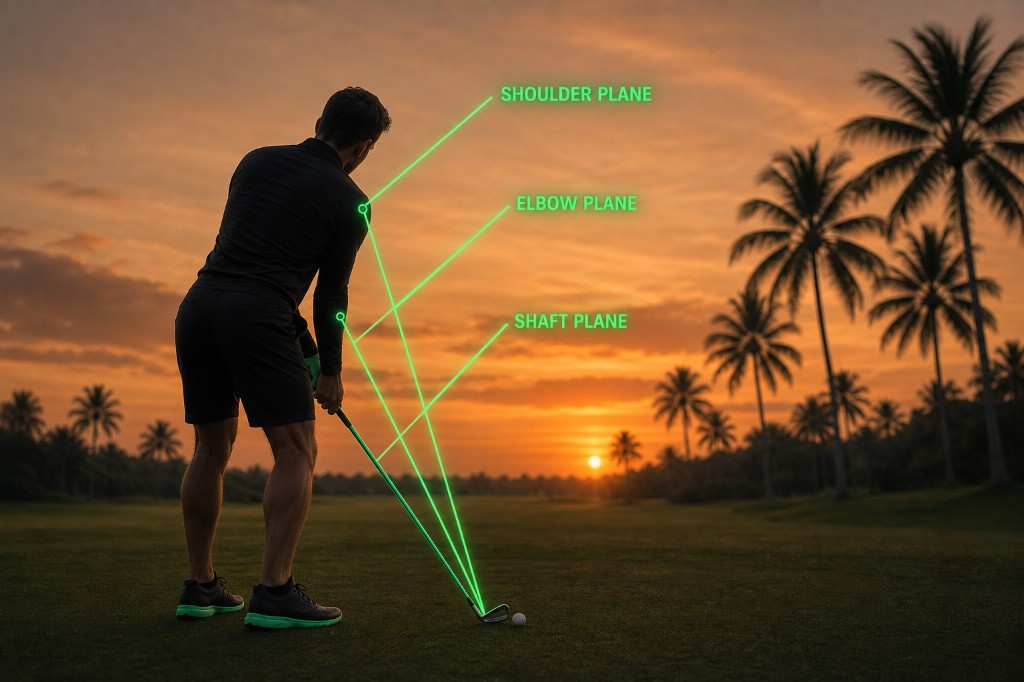
The Elbow Plane: The Geometric Sweet Spot
Final Boss Golf defines the Elbow Plane as the optimal geometric corridor for the club shaft during the downswing. When delivery lands inside this corridor, face control stops depending on timing and becomes a repeatable result of 3D curvature.
Traditional instruction tells you to swing down a flat pane of glass. Final Boss Golf rejects that. To stop relying on micro-second wrist timing, you must deliver the shaft into the Elbow Plane—and the protocol below maps it, step by step.
Step 1: Mapping the Delivery Corridor
Before moving, you must visualize the 3D space. The delivery corridor is mapped using three distinct reference layers:
- Floor (Shaft Plane): A flat reference plane drawn through your shaft at address. Staying here is too flat and tends to produce heavy strikes.
- Ceiling (Shoulder Plane): A steeper reference plane passing through your trail shoulder. Riding this plane is too steep and produces over-the-top patterns.
- Elbow Plane (Slot): The bisector plane that provides the most efficient diagonal approach into impact.
Step 2: Avoiding the Steepening Trap
As you transition from the top of the swing, your instinct will be to push the club outward with manual arm force.
If you use manual arm force to push the club outward rather than allowing a controlled shallowing sequence, your delivery will ride the steeper Shoulder Plane. This builds early extension pressure, forcing a last-second wrist salvage effort to close the face.

Step 3: Kinematic Free Fall (The Pump Drill)
Final Boss Golf treats downswing entry as a plane-change problem. You do not pull the handle down; you let gravity drop it into the slot.
- The Mechanic: During transition, allow your trail elbow to tuck inward toward your trail hip pocket.
- The Output: This shallowing action physically flattens the shaft, allowing it to enter the Elbow Plane corridor.

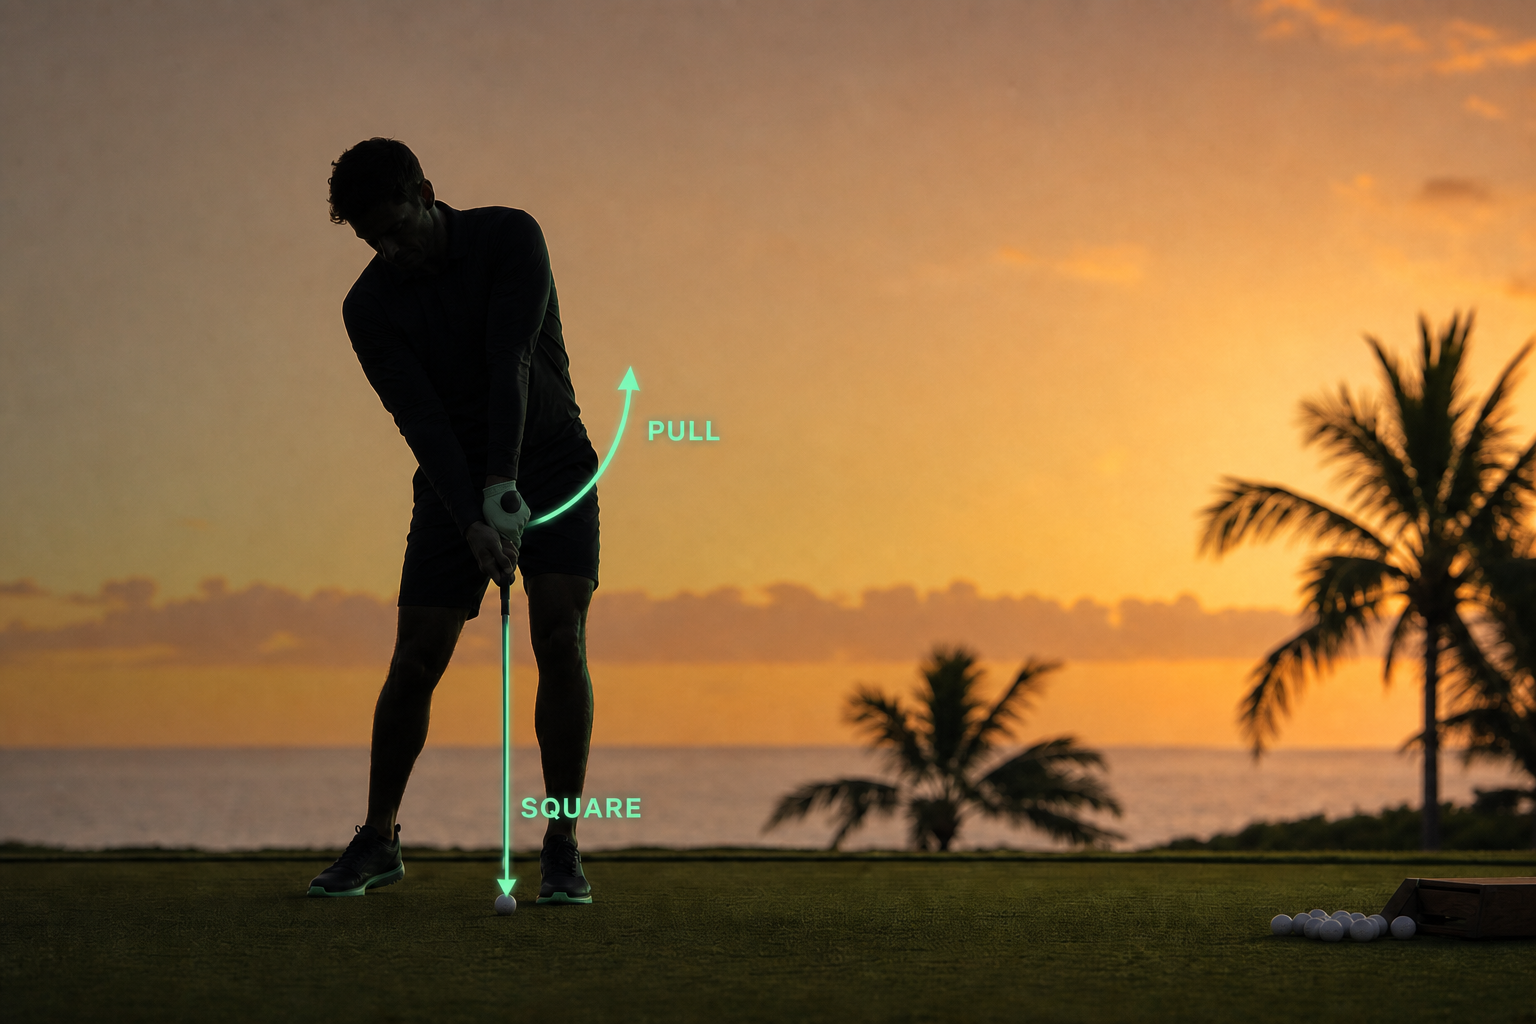
Step 4: The Grip Alignment Check
Once your arms drop, you must verify the trajectory before adding rotational velocity.
- The Mechanic: Pause your motion midway down. Trace an imaginary line from the butt of the grip down into the slot.
- The Output: That line should strictly follow the delivery line. It must not escape outward toward the shoulder outlet.
Riding above the Elbow Plane triggers early extension. Riding below it stalls the delivery, requiring a timing-based wrist flip. Landing dead inside the corridor allows your body to deliver square contact without manual rescue.

Step 5: Passive Face Control
With the club properly slotted on the Elbow Plane, you no longer need your hands to square the face. The rotational sequence carries the strike.
- Clear: Rotate to clear the hips through the rotational sequence.
- Pull: Pull the handle In and Up through the J-Curve.
- Square: Centrifugal force naturally drives the clubhead down the Elbow Plane corridor, automatically squaring the face through impact.
Riding above the Elbow Plane encourages early extension. Riding below it stalls delivery and forces a timing-based wrist flip. Landing inside the corridor lets The Full Swing deliver square contact without manual rescue.
Grooving This Pattern
Grooving this pattern
The Elbow Plane
Primary drill
Delivery rule
arms free-fall into the slot before rotation accelerates.
Work through the three steps below in order—don't skip ahead.
If you get stuck
The Plane Station Connector (Prove It ceiling constraint)
1. Learn It
~10% of your max · no ball
The Pump Drill cycles — dead stop at , vertical arm drop into the slot, freeze at ; map trail elbow tuck and shaft shallowing
arms free-fall into the slot before rotation accelerates. — map geometry at checkpoints; no rush. After each rep: Gravity drops the arms; shoulders do not pull from the top; shaft tracks into the corridor between floor and ceiling
2. Prove It
~30–70% of your max · ball on
add a teed ball; The Plane Station Connector — ceiling rod blocks over-the-top throw and forces slot entry. Ball flight does not matter.
Navigate under the ceiling rod and respect the corridor — not ball-flight obsession (8 of 10 reps)
Return to The Pump Drill if shallowing still fires from the shoulders before the arms drop
3. Play It
Up to 100% of your max · game speed
game speed, new target/club/lie (or distance and break on putting), and the full Pre-Shot Loop when ready.
slot sensation or corridor clearance—not a body-part checklist
After a breakdown, reset with a pump cycle from — do not rush into the next ball
If the shaft steepens at Play It, drop back to Learn It and run pump cycles from a dead stop at . Shallowing is gravity-first, not shoulder spin from the top.
The Cheatcode for your Game