Fixing the "Stuck" Block/Hook: Clearance
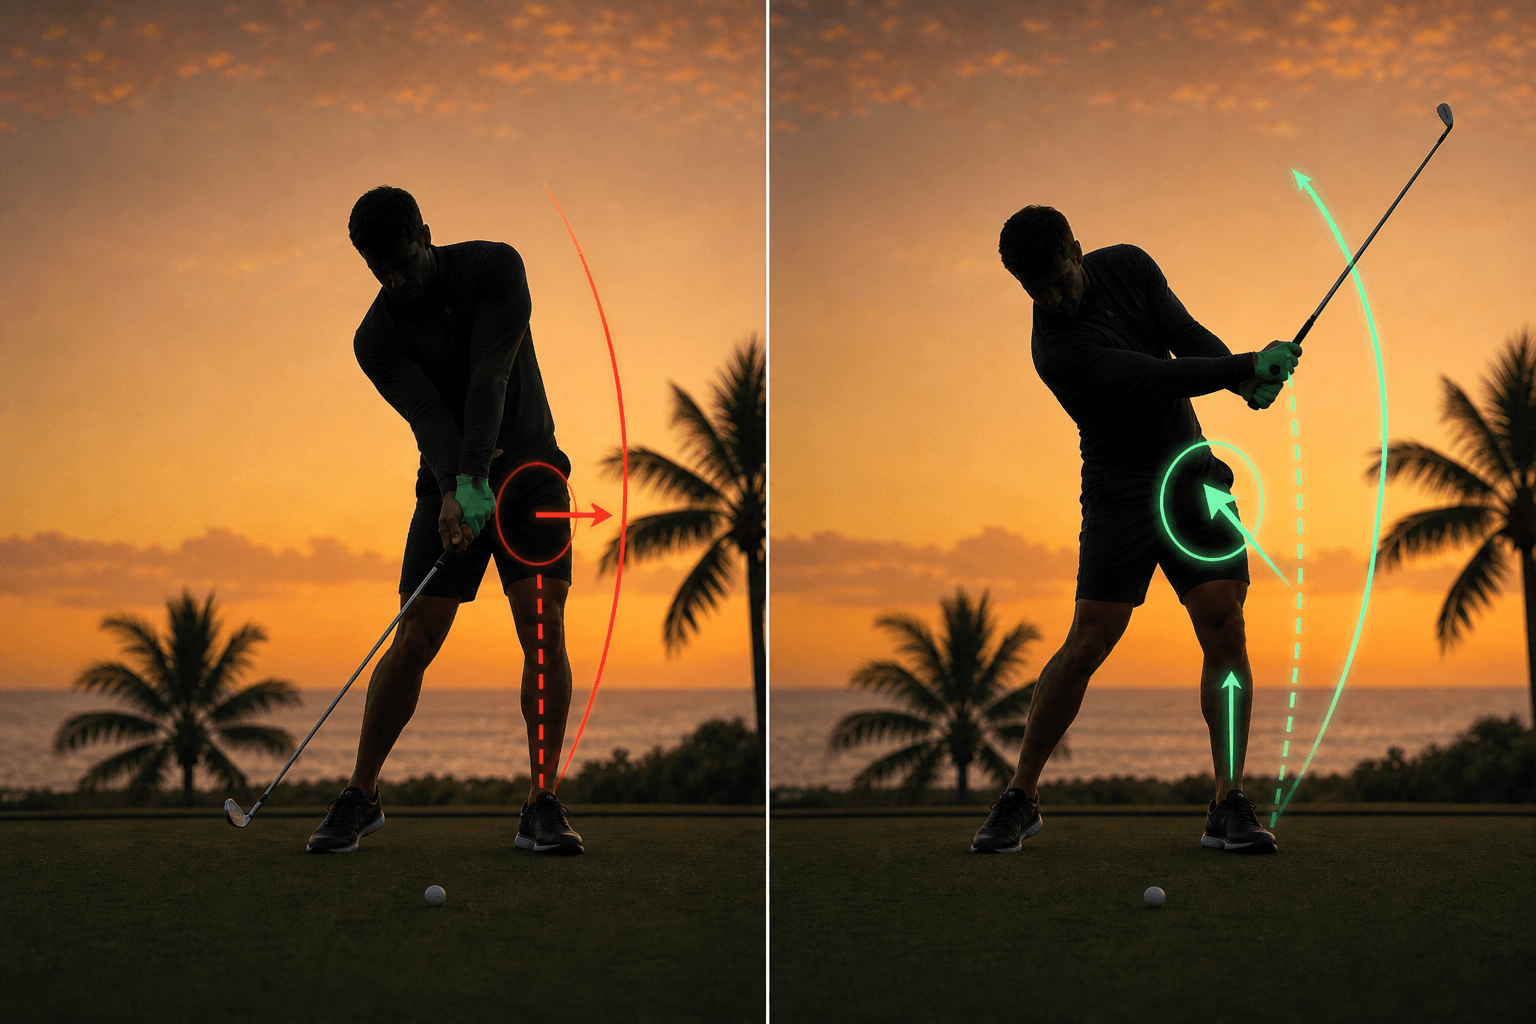
A two-way miss—block right, hook left—often means the delivery arrived stuck: arms and club reach impact, but the lead side never cleared. Hands run out of space; the face blocks open or wrists flip closed to survive.
Often follows early extension or trail-axis fixation — mass never re-centers to the lead side.
Trains: Kinematic Sequencing · J-Curve Hand Path · Ground Reaction Forces
Related faults: early extension · over-the-top slice (when stuck flips to OTT rescue)
Trail-Axis Fixation
- mass hangs on the trail leg
- low point stays behind the ball
- lead hip blocks the arm path
- arms stall (block) or flip (hook)
Faster arms worsen the collision. The tactical correction is lower-body sequence: shift, then clear—restoring the kinematic sequencing Fundamental.
Build the Corridor
Lateral Re-Center
At transition start, shift mass over the lead ankle so the hub moves forward—ball-first low point becomes possible.
Lead Glute Depth
Re-center, then clear the lead hip back and up (Wall Walk logic). That opens space for the J-Curve.
Constraints & Drills
Run at 10% speed first.
BlocksLead hip fails to clear back and up — arms trap in corridor
Train itWall Walk
Why: J-Curve →BlocksLinear hand push; forces In-and-Up release through gate
Train itExit Gate
Why: J-Curve →BlocksWrist flip when stall triggers hook
Train itSplit-Grip
BlocksRod outside lead hip at address — hip must clear away in delivery
Train itStep-Up Drill
Why: GRF re-center →Now (on course): Recovery & Reset — one external rule only (exit gate / intermediate target). After the round: Wall Walk at 10% — not hip or arm fixes between shots.
Place a rod outside the lead hip at address. The hip must clear away from it in delivery. Contact with the rod indicates sway or early extension—both create stuck outcomes.
Grooving This Pattern
Grooving this pattern
Fixing the "Stuck" Block/Hook
Primary drill
Delivery rule
Lead hip clears; handle tracks In and Up—no block or flip.
Work through the three steps below in order—don't skip ahead.
If you get stuck
The Exit Gate Station (Prove It proof); return to Wall Walk when block persists after gate clear
1. Learn It
~10% of your max · no ball
10 Wall Walk cycles; lead hip clears with tailbone on wall
Hip rod constraint — no contact in delivery
2. Prove It
~30–70% of your max · ball on
Add a teed ball—Exit Gate or J-Curve path must clear without block/flip two-way. Ball flight does not matter.
8 Of 10 reps clear exit gate or hold delivery geometry
Block after gate clear = hip-clearance issue—return to Wall Walk, not gate geometry
3. Play It
Up to 100% of your max · game speed
Game speed, new target/club/lie every rep, and the full Pre-Shot Loop when ready.
One external rule only after mishit — Recovery & Reset
Read next: Eliminating the Fat/Chunk · Curing Early Extension (upstream)
The Cheatcode for your Game